Trip Report | Kalalau Trail Kauai PART 1

This blog post is for entertainment only (and maybe a bit of information gathering). We are not backpacking experts, and don’t recommend you follow what we did as a good idea at all. So we hold no liability if you hurt or kill yourself or others while reenacting the tale below. In fact, we would encourage, nay, implore you to not repeat what we did, how we did it. There’s probably much better, safer, and saner ways go about this endeavor than we did. But if epic is what you want, then yeah, sure, make the same mistakes we did and get yourself into trouble. Danger is fun.
Intro:
I don’t recall when or where I first heard about the Na Pali coast. I couldn’t even say when Nicole and I started talking about backpacking along it. Probably it was towards the end of 2012, around the time we began planning our honeymoon. Like many couples, we were thinking Hawaii but weren’t sure about what island. All of the info we got on Kauai and the Big Island suggested that roughing it was the best way to get the most out of those locations. But that’s not what we wanted after the stresses of planning our wedding. We ended up picking Maui over Kauai and the Big Island mostly because we were looking for a relaxing time rather than an adventure. But we vowed to visit those other islands in due time since, after all, Nicole and I do like a good adventure from time to time!
At the start of 2014, we began to seriously look into the logistics of a Kauai trip. And we knew the main objective was going to be backpacking the Na Pali. Upon digging deeper, we found that the Kalalau Trail (the one trail leading down the entire Na Pali coast) is a narrow, winding, muddy foot path complete with serious elevation gains, steep drop-offs, and hazardous stream crossings, that just happens to take you to one of the most pristine, wild, and beautiful beaches in the world. Sounds like fun!
It’s a 22 mile round trip from the trailhead to the beach and back, with over 10,000’ of elevation gain and loss over those 22 miles. This means that you’ll be hiking up hill for 10,000’ of vertical gain, and also hiking downhill for that same 10,000’ over the course of those 22 miles. The Sierra Club has a degree of difficulty rating system ranking trails from 1 (easiest) to 10 (really flippin’ hard!). The Kalalau Trail comes in at a 9. This would be an ambitious goal since I hadn’t been backpacking since 2007 and Nicole hadn’t been backpacking since she was born. But, whatever, we were going on an ADVENTURE!!! <channeling Bilbo Baggins from The Hobbit>.
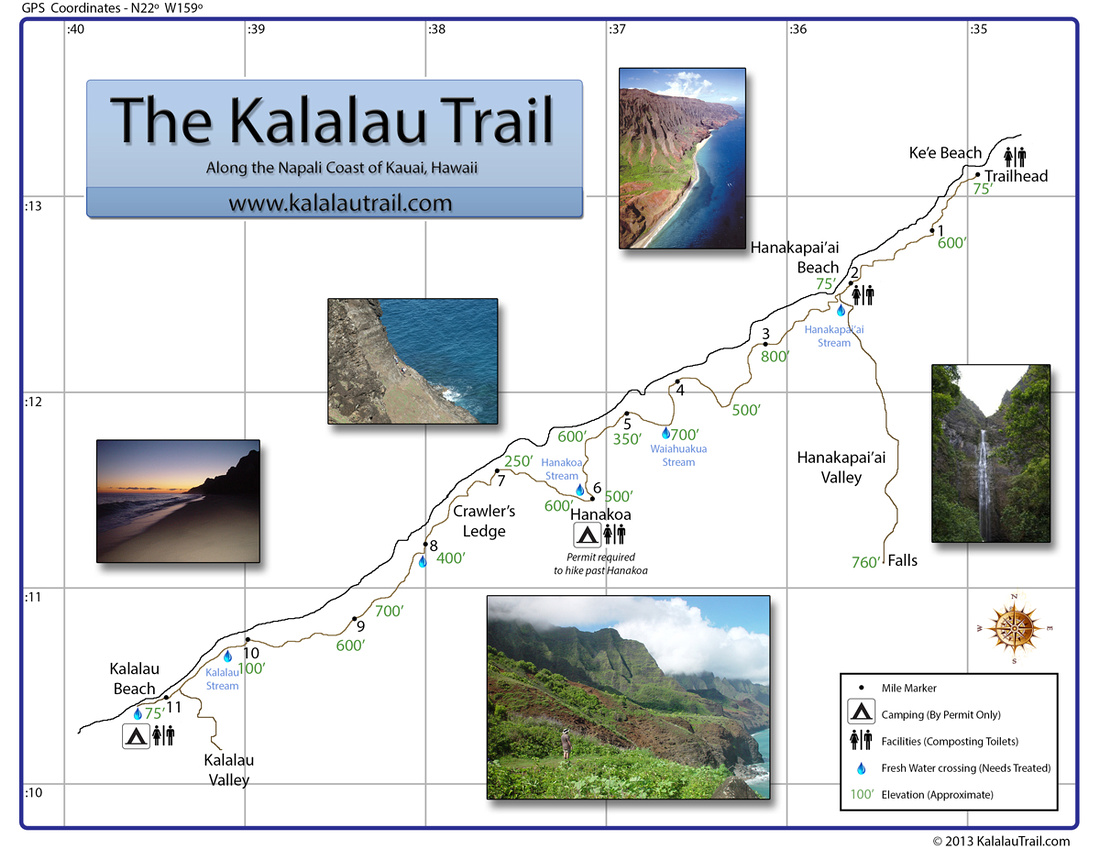
Kalalau Trail stats:
- Length: 22 miles round trip from trailhead to Kalalau Beach and back.
- Difficulty: 9 out of 10 on Sierra Club’s difficulty scale (very difficult).
- Elevation gain/loss: 10,000 feet
- Hazards: Muddy/slippery footing, Exposure (steep cliff drop offs), rock fall, river crossings, flash floods, wildlife (goats and boars, but nothing poisonous), and last but not least - dirty hippies who’ve dropped out of society to live on the trail full time (they’re actually quite friendly, but are frequently naked, high on drugs, and smell really bad)
- Permits: If you plan on hiking past the past Hanakoa Valley 6 miles in from the trailhead, a permit is required.
- Time required to complete: Some badasses do the 22 miles as a day hike. We are not badasses and decided to take 3 days. In retrospect, taking 4 or 5 would have been nicer.
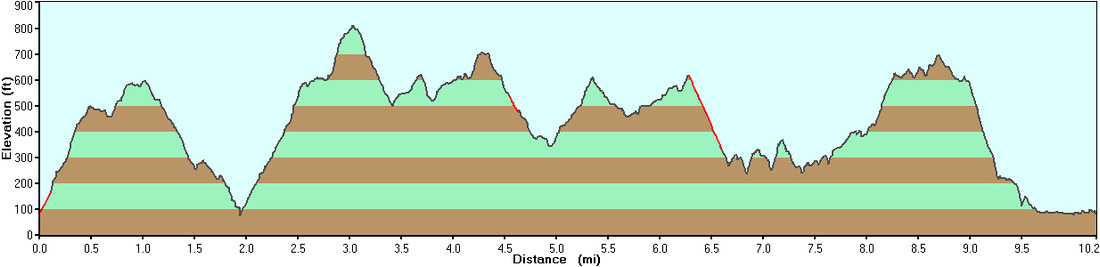 Kalalau Trail Elevation Map
Online resources:
By far the best resource we found for this was http://www.kalalautrail.com. It’s packed with all sorts of information on the trail, planning, and trip reports from other hikers, as well as providing info on other ways to enjoy the Na Pali coast. http://www.napali.com is ok, but more geared towards guided boat and helicopter tours. There are plenty of general backpacking and camping websites out there, find which ones work for you. Apply for your permits here: https://camping.ehawaii.gov/camping/welcome.html.
Gear list:
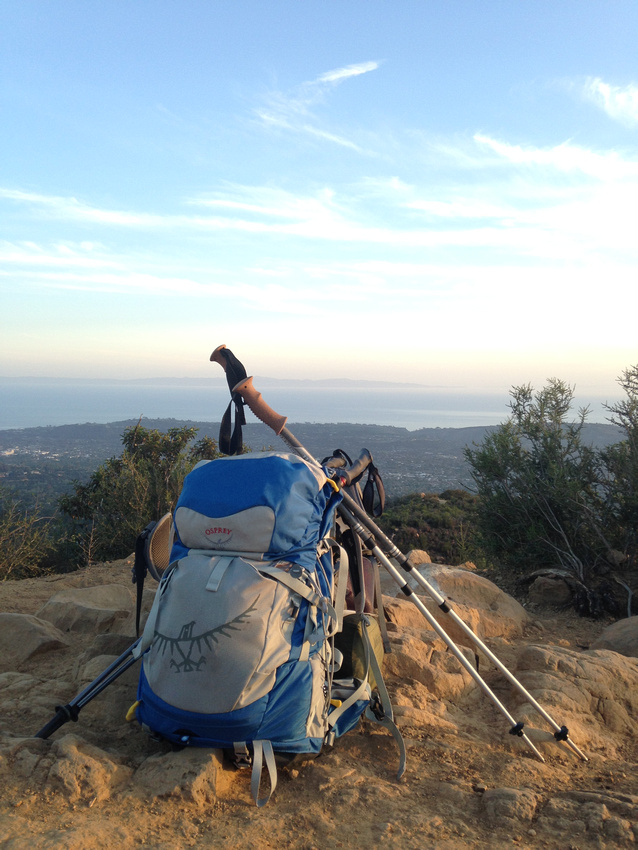
- ~50L lightweight backpack: Make sure it’s comfortable and fitted to your body.
- Lightweight tent/shelter: We have the REI Quarter Dome T2.
- Lightweight trail-runners, broken in: DON’T skimp on these! I wore Salomon XA PRO 3Ds and Nicole wore Vasque Velocitys. They’re both mesh/draining which is useful for all of the stream crossings done in them. We saw all sorts of footwear on the trails from heavy hiking boots to Keens and Chacos to Vibram Fivefingers, and even one dude wearing what looked to be aqua socks. The hippies were all barefoot. All have pros and cons, just wear what’s best for you.
- Treking poles: They are worth their weight in gold, frankincense, and myrrh, COMBINED!
- Lightweight sleeping bag or liner: We have Cocoon sleeping bag liners.
- Sleeping pad: We have Thermarests.
- Inflatable pillow: If you like to pamper yourself, and we do.
- Lightweight backpackers stove: We have a Primus Classic Trail stove.
- Cooking pot: Unless you use a Jetboil where everything is one piece.
- Fuel: Note - if you are not permitted to fly with camping fuel, even in your checked luggage. If you have a canister stove you can buy fuel canisters at Kauai Kayak in Kapaa. They also sell partially used canisters at a discount. When you’re done on the trail, stop by and give them your canister back so they can pay it forward!
- Eating utensils and bowls: The bowls are optional, but unless you plan on only having finger food, I recommend bringing a spork.
- Multitool: Swiss Army knife or Leatherman.
- Sunscreen: You’ll need it.
- Bug spray: Unfortunately, you’ll also need it.
- First aid kit: Hopefully you won’t need it.
- Water bladder/bottles: We each have 2L bladders that fit in our backpacks. We also brought 2 1L Nalgenes but didn’t really use them. We also have a 3L camp bladder, MSR Dromedary, which works great once you’re at camp.
- Iodine or other water purifier: We prefer iodine since it’s lightweight, kills viruses that water filters can’t remove, and UV SteriPens can only purify one Nalgene at a time.
- Nuun or other hydration tablets: Not absolutely necessary, but really nice to have for electrolytes.
- Clothes line: Your clothes will get wet, it’s nice to hang them to dry when at camp.
- Toilet paper: There are toilets at the trailhead and beach, also at the 2 and 6 mile points along the trail but TP is not guaranteed. If you think you’ll need additional potty breaks, bring a WAG bag too. Pack it in, pack it out.
- Toothbrush, toothpaste, other personal hygiene stuff and medications.
- Copies of trail permit and map: We didn’t need to use either, but better safe than sorry.
Clothes (bring as few changes as you’re comfortable with):
- Sun hat
- Sun glasses
- Bandana
- Rain jacket
- Lightweight shirt
- Hiking shorts
- Lightweight socks: Merino wool is great!
- Undies: Going commando can lead to chaffing.
- Long underwear or other insulation layer: Nights do get chilly! A lightweight fleece might be necessary if you run particularly cold at night.
- Bathing suit: You ARE going to the beach, after all! Or you could just go in your birthday suit…
- Camp towel
- Sandals or other camp/beach shoes
Food:
Different people have different ideas when it comes to food on the trail. Regardless of what you do, make sure you bring enough calories. You’ll be exerting yourself quite hard on this trail and you don’t want to bonk in the middle of it! Bear in mind that with rain being unpredictable in the area, flash floods closing down stream crossings is a real possibility. You might want to bring extra food in case you’re stranded for an additional day. Below is a list of what we took. All in all, we estimated to have brought 10,000 calories each for the 3 days.
Breakfast (in camp):
- “Concoction”: Instant oats, buckwheat sprouted grains (grouts), flax meal, almond slices, dried cranberries, peanut butter chips, all mixed together. Just add boiling water. YUM! Brought enough for 3 meals.
- Starbucks Via: Definitely need that caffein kick! Bring creamer and sugar too, if that’s your thing.
Lunch/snacks (on trail):
- Simple trail mix: Mixed nuts, raisins, and M&Ms.
- ProBars: Whole food bars very high in balanced calories, and taste great. We each had 4.
- Bagged tuna in oil: Great serving size, less bulky than cans, get tuna packed in oil instead of water for extra calories (and taste!). We each had 2.
- No refrigeration necessary cheese: Sounds gross, tastes great when you need calories.!
- A few of bags of jerky: beef, turkey, and pork
- Flour tortillas: Less bulky than bread, same calories.
- Single serve peanut butter and nutella: Spread on tortillas for a great afternoon pick-me-up!!
Dinner (in camp):
- Backpackers Pantry or Mountain House prepackaged dehydrated meals: These are easy and after a long day of hiking actually taste pretty good. Just add boiling water, and they cook in the bag so no clean up either! Each meal/bag is 2 servings, but only ~350 calories per serving, so we brought 3 each. I recommend trying to find the low sodium meals. If you bring tortillas, these prepackaged dinners make excellent burritos when wrapped.
Cameras:
This is a photography blog, after all!!! We debated long and hard about what to bring. The GoPro Hero3 Black was definitely coming. But we we unsure about what high quality camera system to pack for those shots that require some extra quality. The options were a DSLR, compact mirrorless with interchangeable lenses, or a nice point and shoot with manual controls. The DLSR was bulky, but we already own a few of those and they take great shots! A nice point and shoot would be compact but how much better would it really be than the GoPro? A compact mirorless would be a great combination of quality and convenience, but we don’t own either a camera or lenses and renting a full system would be expensive. In the end, we ended up buying a pancake 40 mm f2.8 lens to put on our full frame Canon 6D DSLR.
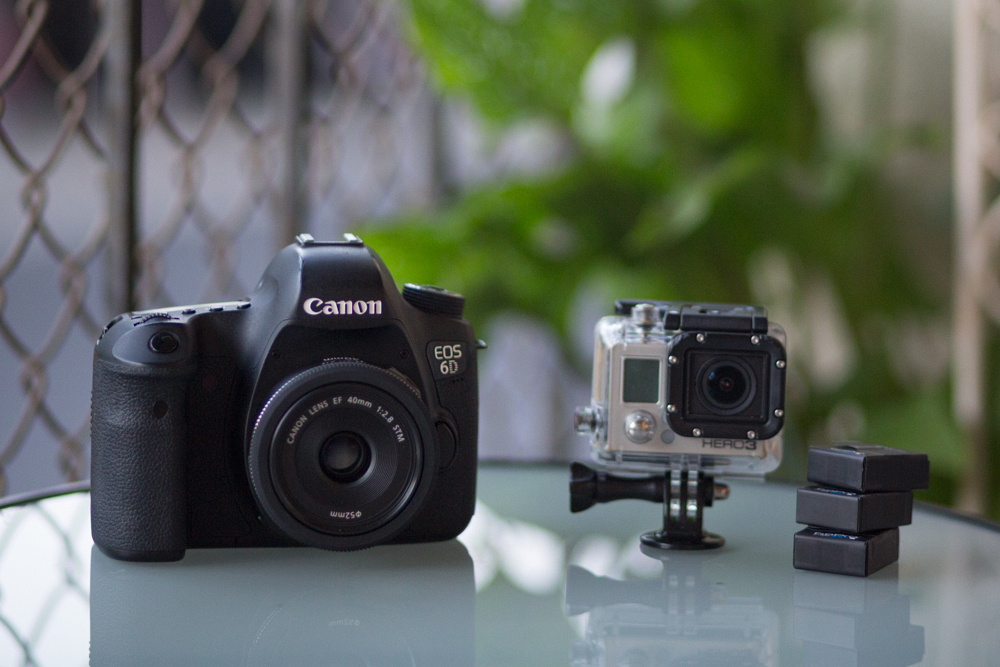 Canon 6d with "pancake" 40mm f/2.8 (AKA shorty forty) and GoPro Hero 3 Black Edition with 3 extra batteries
Training:
As mentioned above, I hadn’t been backpacking in almost 7 years and Nicole hadn’t been backpacking in her entire life. We’re young, active people (well, not as young or active as we used to be) but knew we’d have to get a more miles on the trails in before tackling this Hawaiian monster. Fortunately, living in Santa Barbara gives us access to a great trail system and we were able to go for short hikes after work during the week, and longer ones on the weekends.! We started just hiking with water and a bit of food, and gradually increased our pack loads up to the same weight, or at least close to the same as what we were brining with us to Hawaii. We got a few looks from other hikers since we had so much gear on our backs, but whatever. We were feeling a lot tougher compared to them.
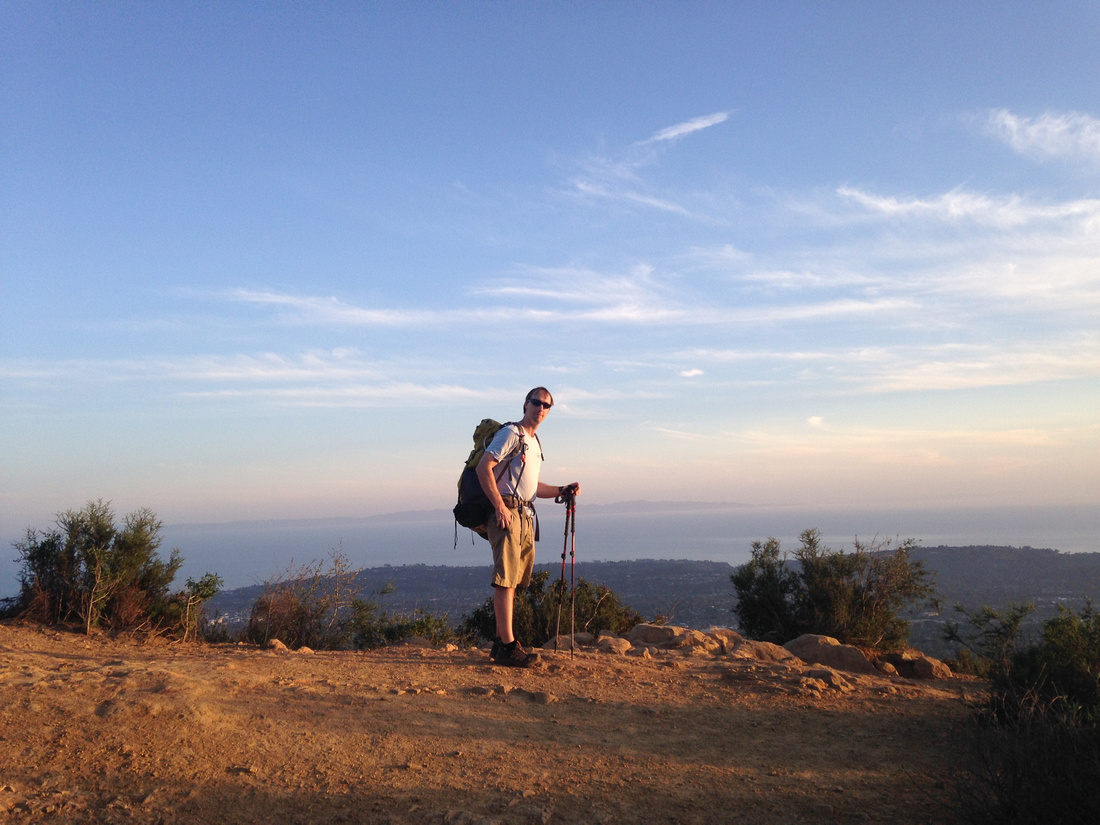 Training Hike. Inspiration Point Santa Barbara, CA
 Training Hike. Inspiration Point Santa Barbara, CA
The Main Event:
We flew from California to Lihue airport on April 26th. During the approach to the airport we could see the sea cliffs on the southeast side of the island and knew that the northern coast had just as much, if not more waiting for us.
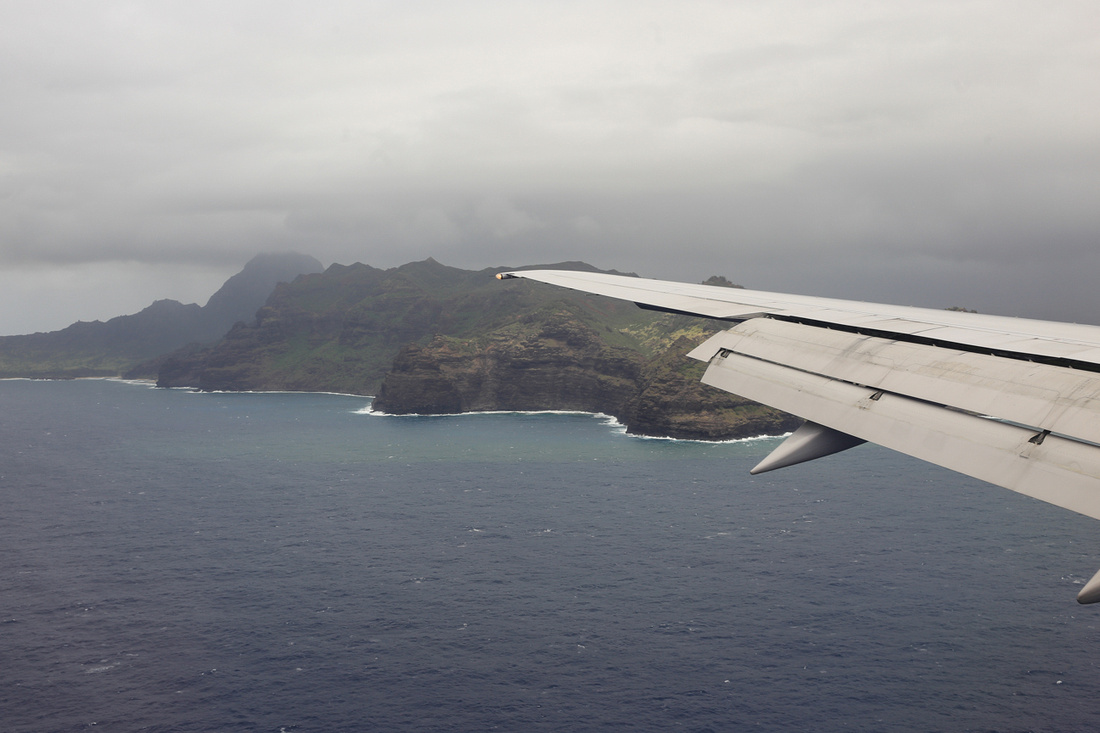 Kauai from the airThere will be plenty more cliffs like those on the trail!
After getting our luggage we took a shuttle to the Courtyard Marriott in Kapaa. Our friend, Daniel, travels an ungodly amount for work and basically lives in hotels. Marriott is his preferred chain and he gets treated like royalty at any Marriott hotel in the world. He happened to have a free night available for the Courtyard Kauai resort and hooked us up! After a lunch of kalua pork sliders and local beer, Nicole and I took stock of all of our gear, organized and packed our bags.
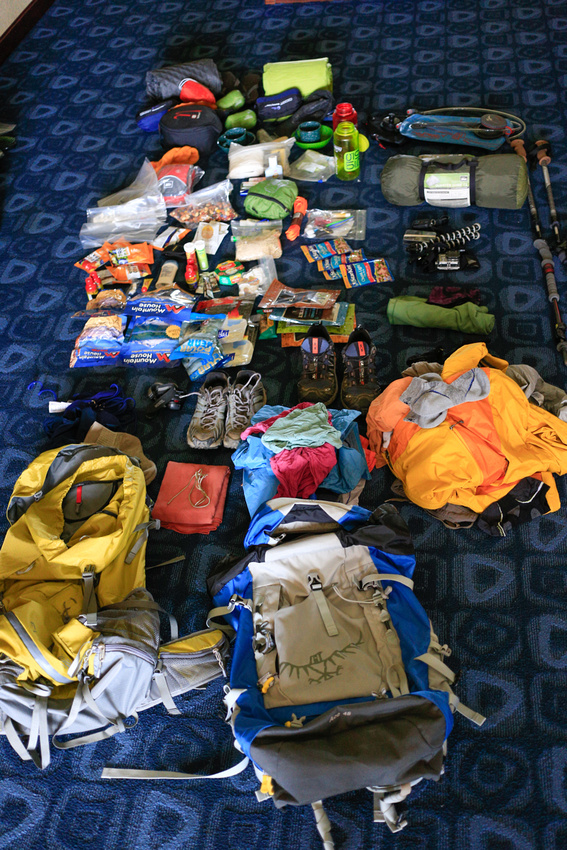 Na Pali Kalalau Trail Backpacking Gear for 2 people
We still had a few hours before our Dan and our other friend Prasant were set to arrive (they were planning on day hiking the first few miles of the trail with us, but not backpack the whole way), so we decided to walk a couple of miles down the road to Kayak Kauai as a warm up to the trail, and also to buy a canister of camp stove fuel. As mentioned in the gear list above, Kayak Kauaii in Kapaa sells partially used isobutane fuel canisters. You can’t fly with them, so backpackers can just drop off their canisters here after finishing up their trip, and frequently they have more than enough fuel for at least a week long hike. Score!
Back at the Marriott, Prasant finally showed up but Daniel was delayed, so we got some pizza and beer at Bobby V’s, just a quick walk from the hotel. The restaurant doesn’t have a liquor license, but you can buy a 6-pack and bring it in. It was damn good NY style pizza and is highly recommended.
Our original plan was for a 3 day backpacking trip. We would cover the full 11 miles from the trailhead to Kalalau Beach on day 1, hang out on the beach and hike 5 miles back to Hanakoa Valley on day 2, and then leisurely hike the 6 miles back to the trail head on day 3. Since tomorrow was going to be the big 11 mile day and we were still used to mainland timezones, we all went to sleep rather early. Daniel eventually showed up sometime in the middle of the night, which is good since he was our ride to the trailhead in the morning. We woke up around 6 am hoping to get on the trail by 8 or so, but didn’t actually make it there until about 10. Sunset was just after 7 pm, so we knew we had to get a move on if we wanted to cover those 11 miles without resorting to headlamps.
April 27-29th 2014
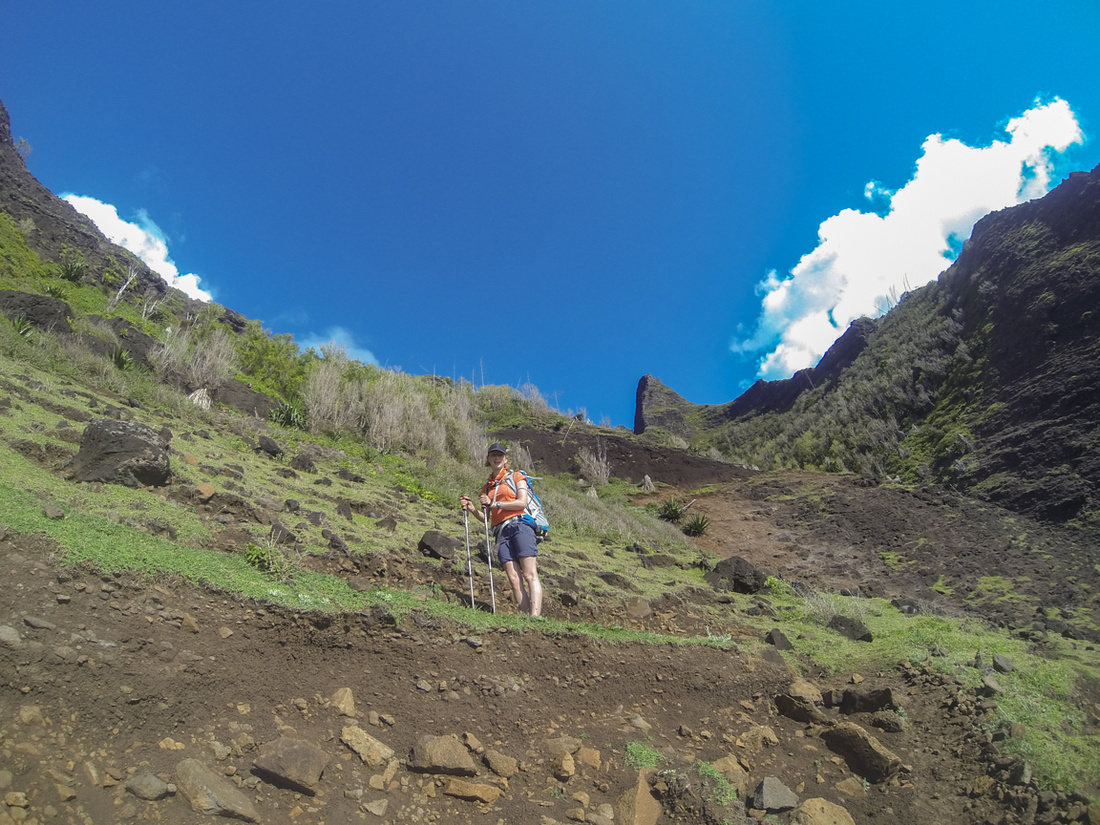
Miles 0 - 2:
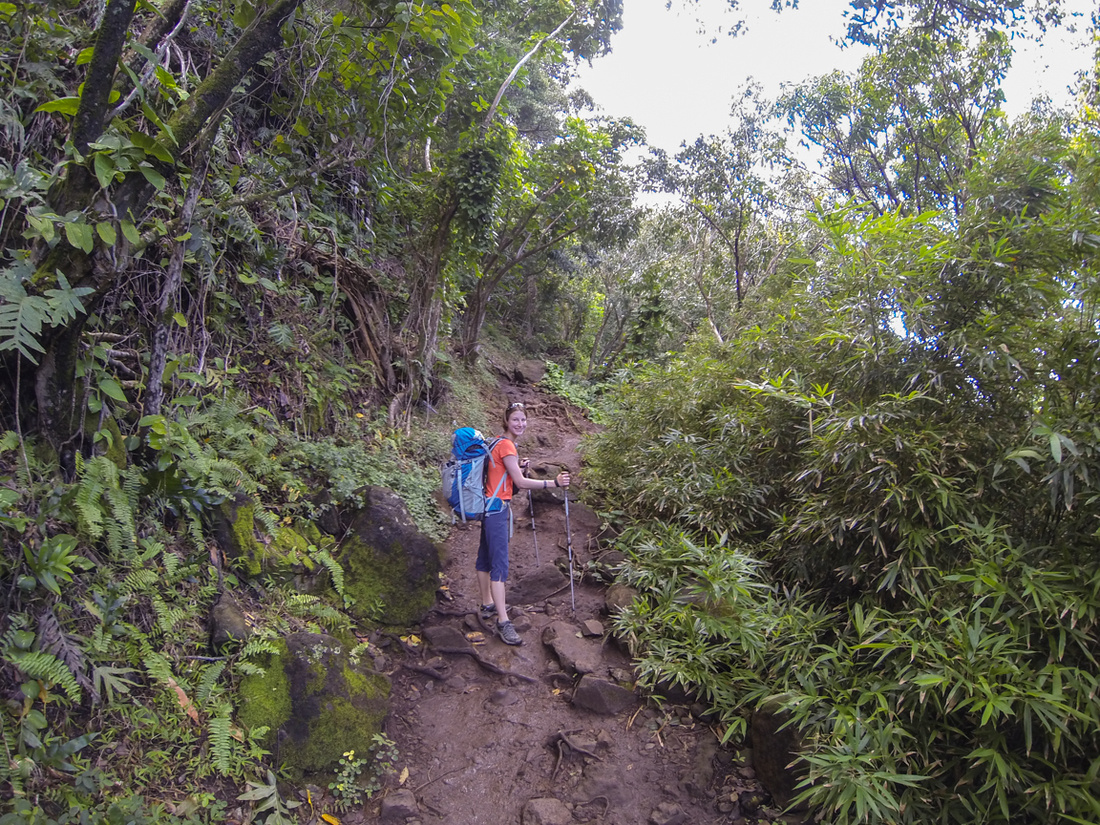
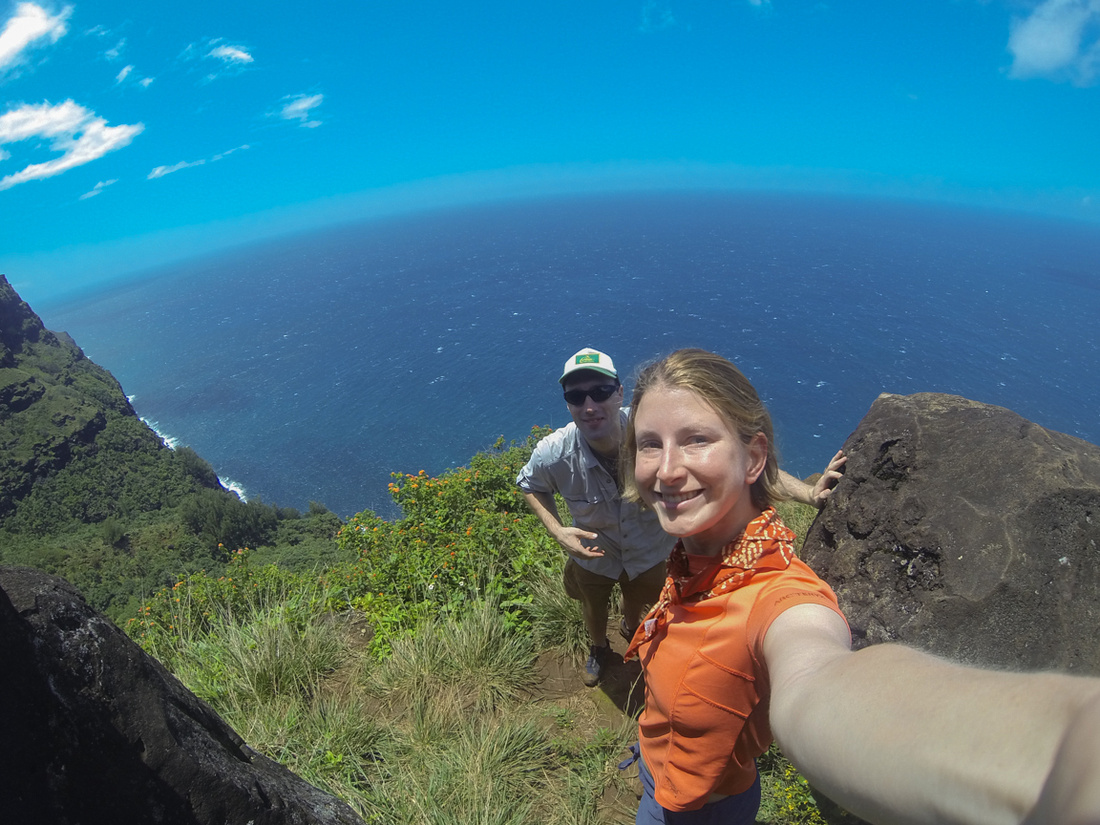
The first couple of miles of the Kalalau Trail are a popular day hike since at Mile 2, you’ll reach Hanakapi’ai Beach. That means these first 2 miles are crowded, foot traffic is high. and the trail well worn. It had also rained quite a bit in the prior days, so the mud was deep and slick. We’re glad we had trekking poles to help with the hills! Daniel and Prasant weren’t content to move at the slow pace that Nicole and I were going at (probably because they didn’t have 25 and 45 pound backpacks on) and decided to forge ahead to Hanakapi’ai without us. It took some initial adjusting to efficiently hike on the wet stone and mud of this trail compared with the dry, hard packed dirt of the Santa Barbara trails we were used to. The heat and humidity didn’t help either, but we were enjoying it none the less. Perhaps a bit too much. There were all sorts of great spots to stop and take pictures and we were doing just that way too often. Eventually we realized that if we didn’t pick up the pace, we wouldn’t make it to Kalalau that night. So we plugged on ahead.
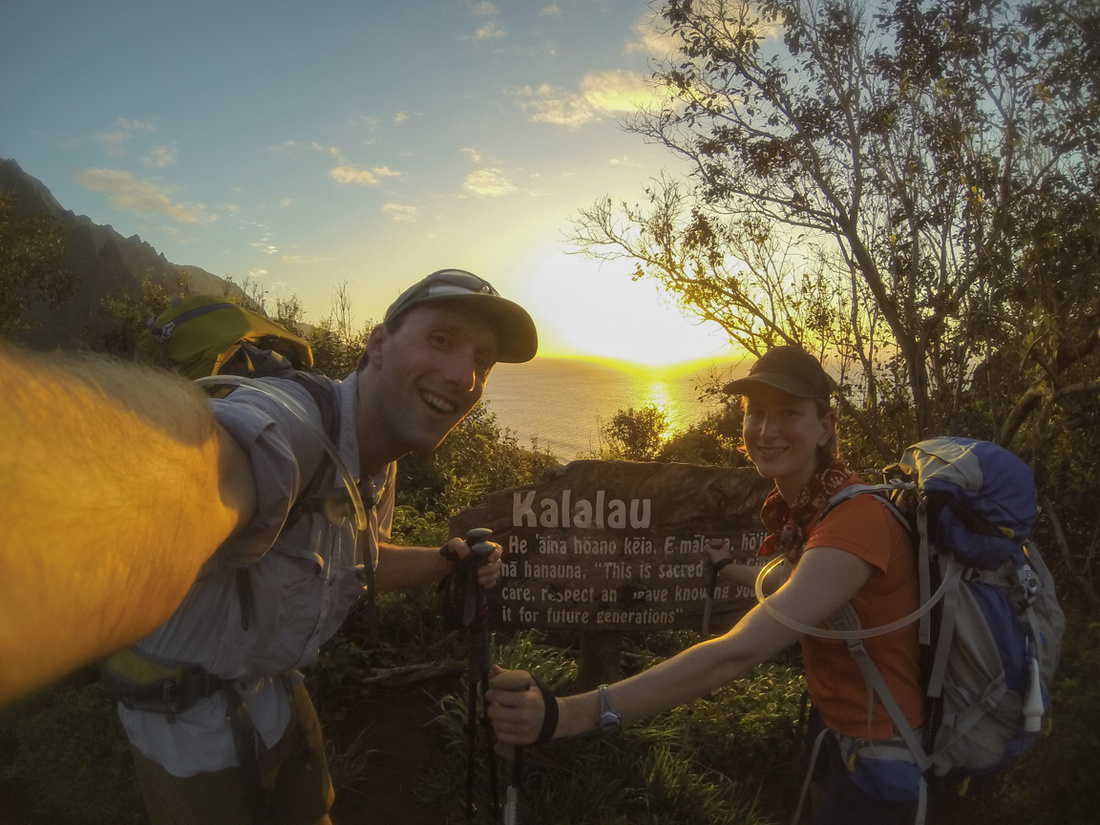
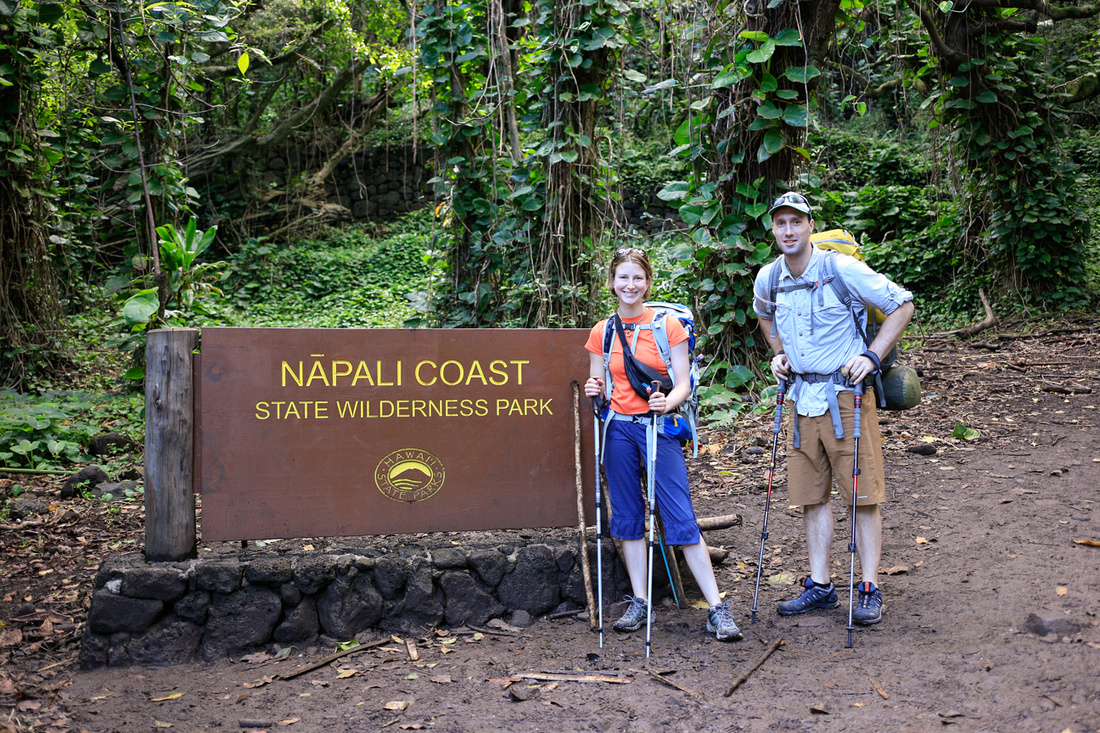 First two miles of the Na Pali Coast Kalalau TrailThe sign at the trailhead. Let's start this adventure!
 First two miles of the Na Pali Coast Kalalau TrailIt's all smiles these first few miles.
 First two miles of the Na Pali Coast Kalalau TrailOne of the first ocean views from the cliffs on the trail
 First two miles of the Na Pali Coast Kalalau TrailYou can almost see down the coast to our final destination. Almost...
 First two miles of the Na Pali Coast Kalalau TrailLooking back towards the starting beach
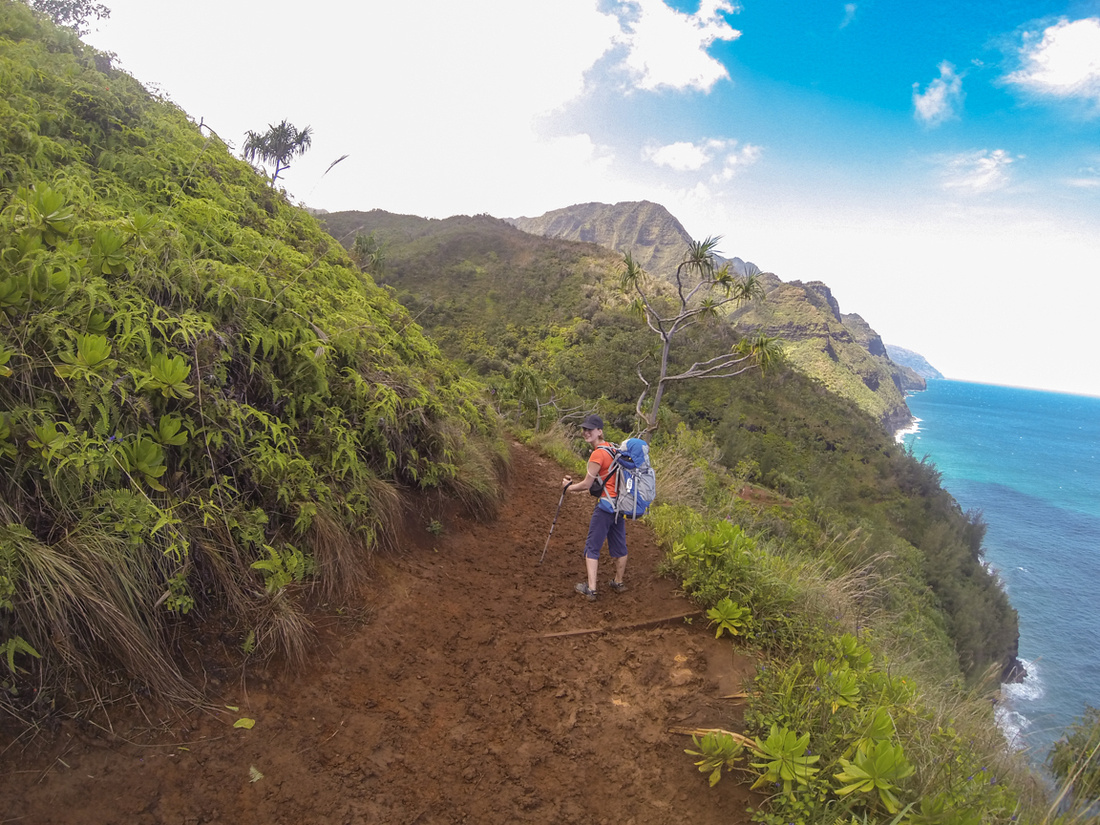 First two miles of the Na Pali Coast Kalalau TrailThe mud gets thicker and thicker the further you hike
Just before making it to Hanakapi’ai beach, we had to go down what was essentially the equivalent of a mud water slide. We ran into several day hikers who decided to turn back at various stages of this slide, mud coating their butts and backs because they couldn’t stay on their feet walking down. At the bottom was our first major stream crossing. Due to all of the rain, the water was rather high, but not particularly treacherous looking. None the less, we dutifully undid our backpack waist and chest straps before heading in. It’s always a good idea to do this just in case you fall down. You don’t want to have your backpack pin you down in moving water, and unbuckling straps lets you slip out easily.
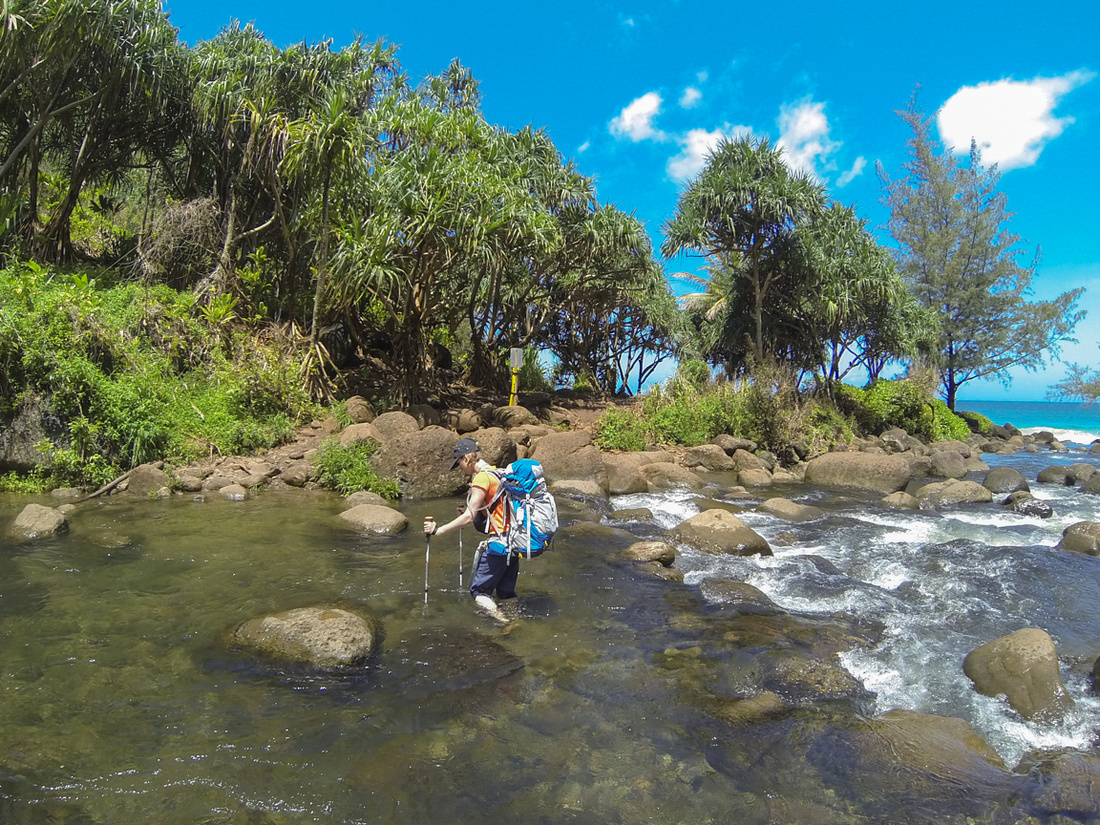 First Stream CrossingThree cheers for hiking poles!
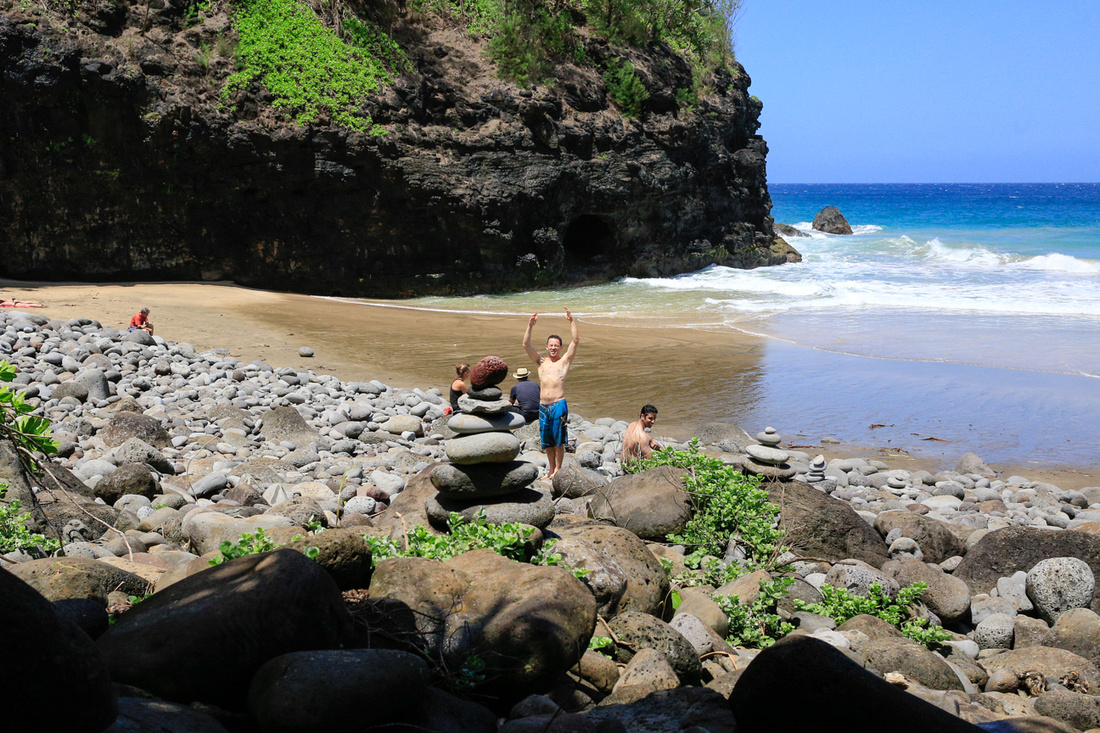 Hanakapi’ai beach - 2 miles inDan and Prasant greeting us to the beach
Just on the other side of the stream was Hanakapi’ai Beach. We had a little food and found Daniel and Prasant, but didn’t linger too long. We had to keep on keeping on, and so bade our farewells, agreeing to meet again in 2 days time.
Miles 2 - 6:
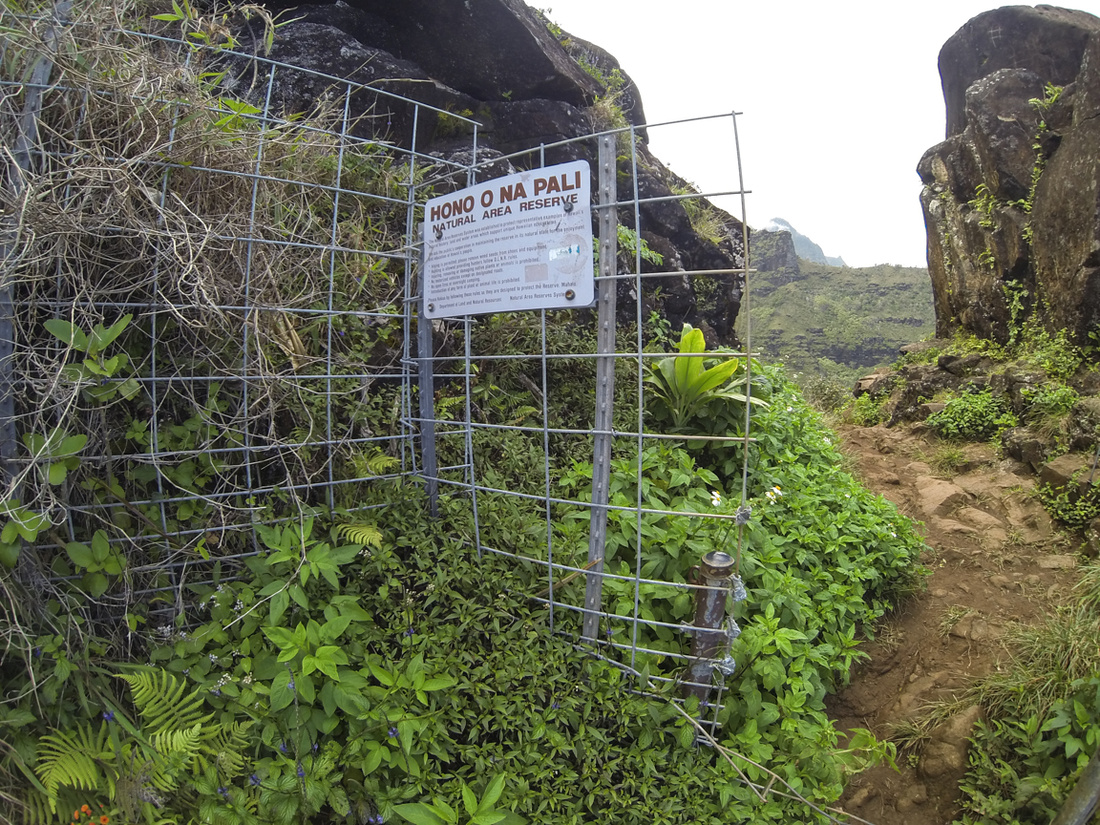
The trail continues on from the beach and immediately heads up switchback after muddy switchback. Over the next mile, we hiked up to the maximum elevation point on the trail at 800 ft above sea level, a formation called Space Rock. Some of the switchbacks are in dense foliage while others are more exposed to the sun. It’s shaded and cooler when you’re in foliage, but the trail is at it’s muddiest slickest, while in the sun the footing is better, but it is quite hot! At the 3 mile mark, you’re at the trail high point and can enjoy the views and some much needed food as you cross over into the natural reserve area.
 Mile 3: entrance to reserve area and Space Rock on the right.
 Mile 3 Kalalau TrailShot from behind Space Rock, highest point on the Kalalau Trail
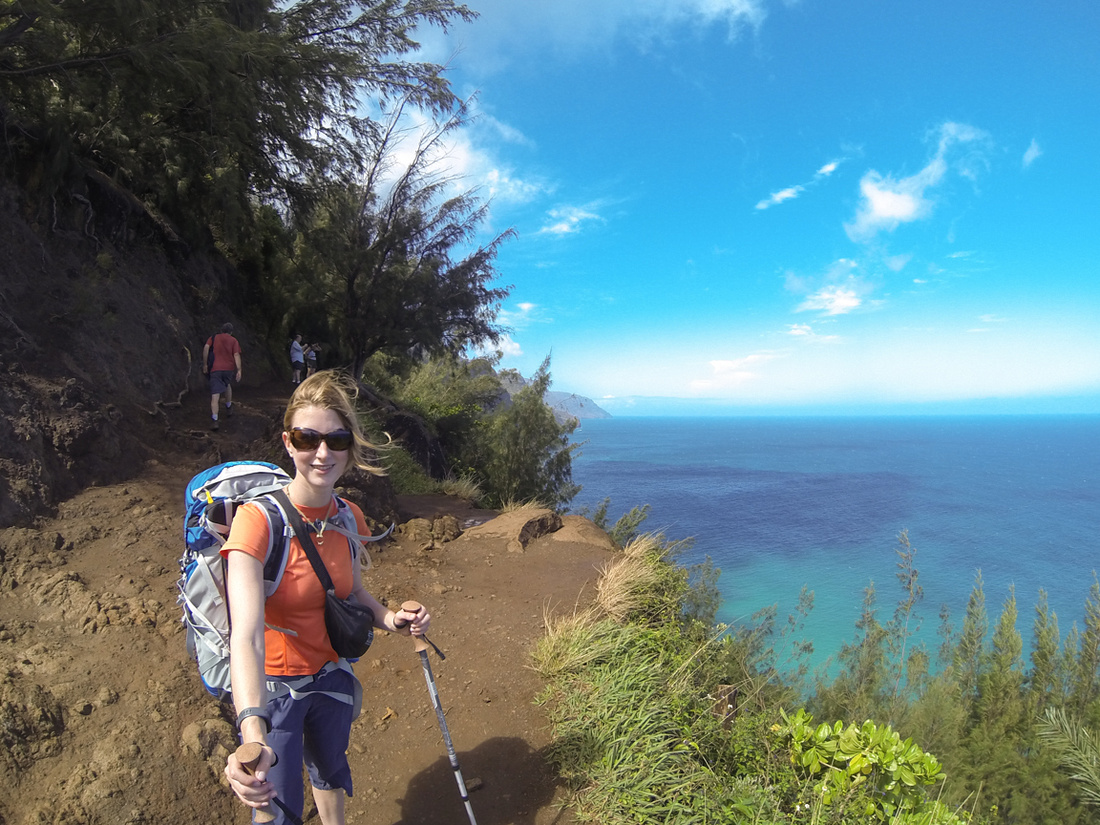
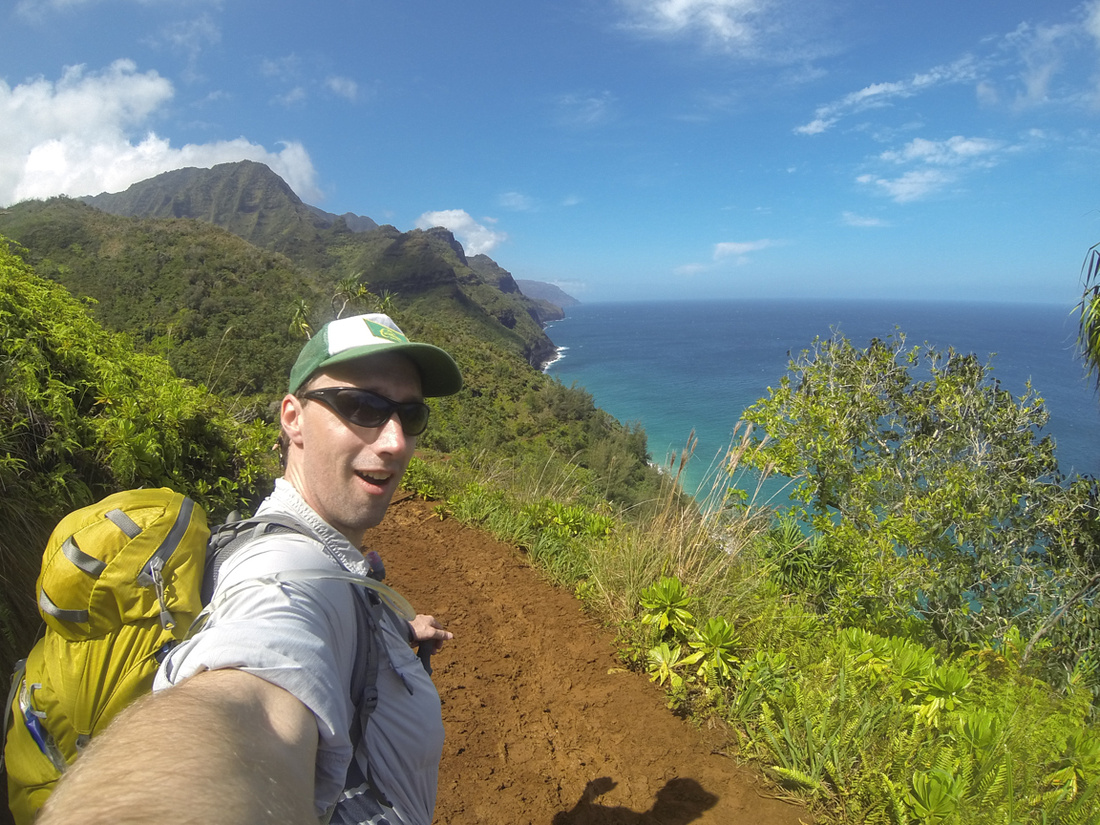
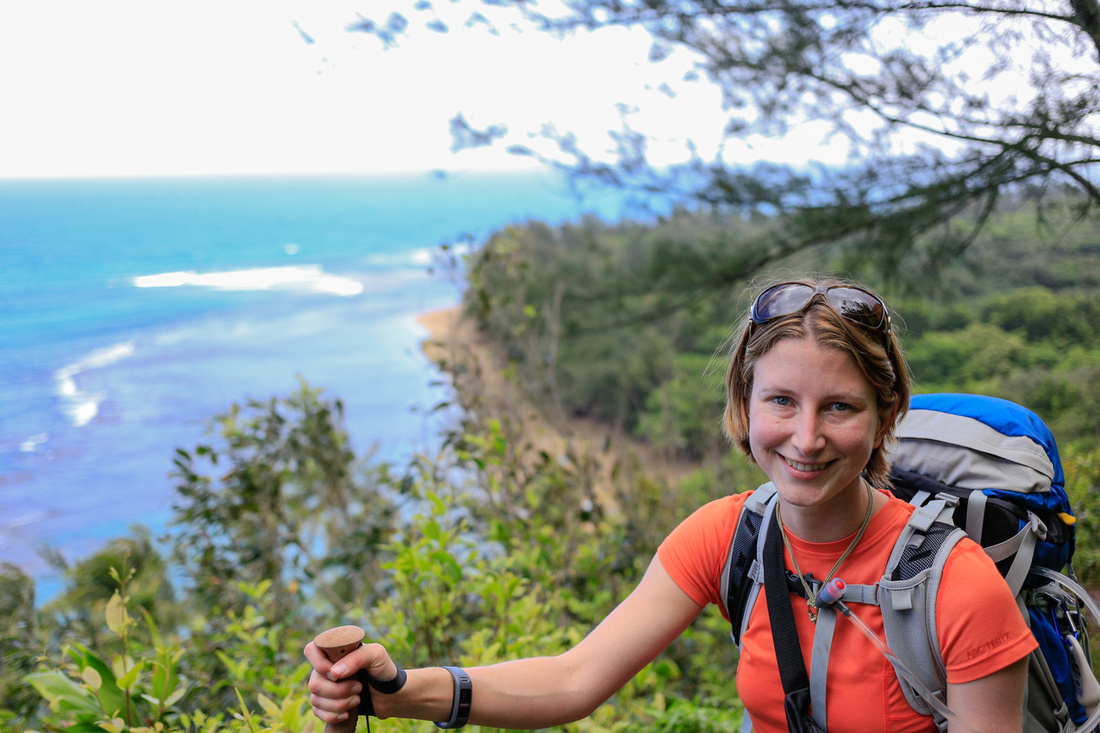
For the next 3 miles, the trail follows a similar pattern: Head downhill and inland away from the coast into a valley (frequently passing waterfalls), cross a stream at the valley center, head uphill and towards the coast (passing other waterfalls), round the corner and follow the coast for a little while, repeat. The views down the coast were phenomenal, and the more miles you hiked down the trail, the better the views back up the coast became! The cliffs surrounding the valleys were tall and imposing, but also always covered in a verdant, welcoming coat of foliage that made it more Garden of Eden than Mordor and Mt Doom. There weren’t any terrestrial animals to see, but we could hear birds calling back and forth across the valleys and occasionally see them flying overhead. We also saw and heard a LOT of helicopter tours above and power boat tours in the ocean. It’s big business here and if you think the hike is going to be a tranquil nature experience away from the sights and sounds of the city, well, it mostly is. But there’s still the random helicopter and power boat to bring you back to reality.
Eventually we got to a valley that was MUCH bigger than the ones we had previously been traversing through. It was about 3:30 pm at this point and we were starting to get worried because we hadn’t even passed the halfway point yet. We encountered a couple hiking the opposite direction and they told us that we were entering Hanakoa Valley now and would get to that campground soon. 30 minutes later, at 4 pm, we were there.
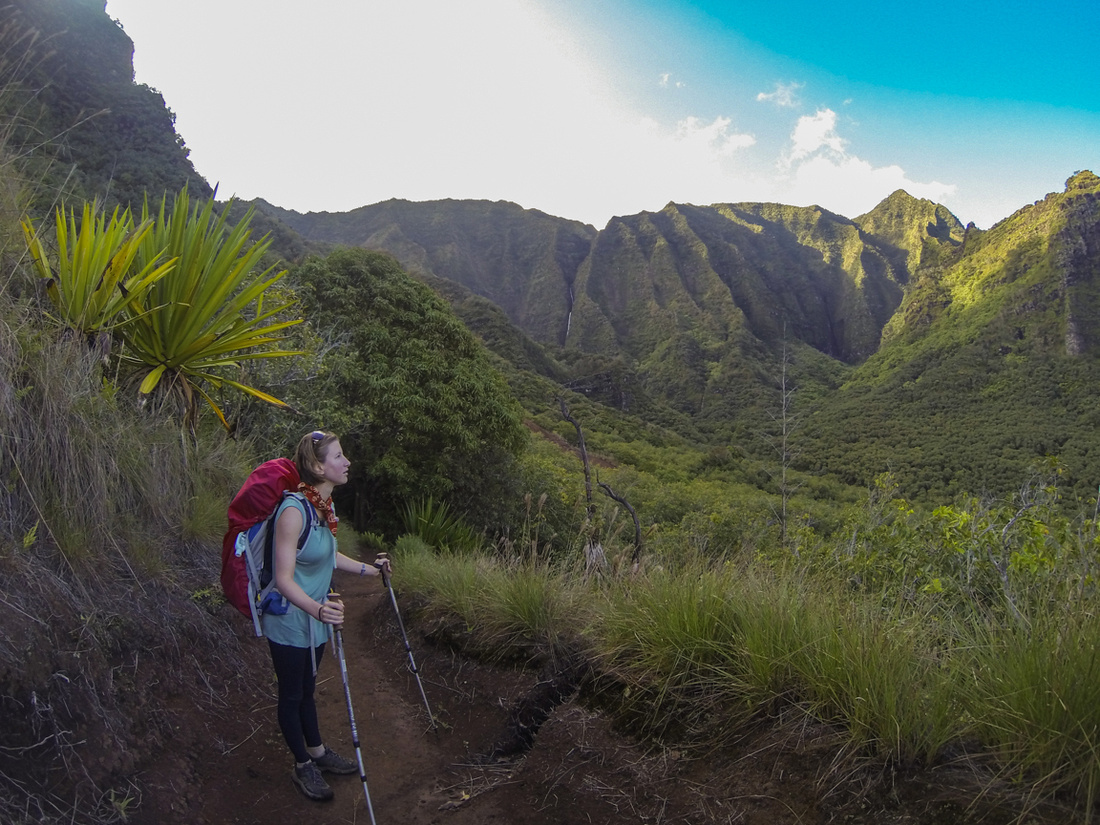 Kalalau TrailLooking into Hanakoa Valley. Shot taken on day 3 hiking back out.
It was concerning to us that we were only moving at a pace of 1 mile/hour. If we held that pace we wouldn’t make it to the campground at Kalalau beach until 9 pm, a full 2 hours after sunset. Hanakoa Valley is the only other location on the trail where camping is permitted, so we had a decision to make.
If we wanted to stick to our 3 day plan we had the following options:
- Stick with the original plan, charge ahead and make it to Kalalau Beach that evening. Picking up the pace would be necessary.
- Stay at Hanakoa that night, leave the camp set up and our overnight gear there, and day hike out to Kalalau Beach and back the next day. Hike out from Hanakoa to the trailhead on day 3, as originally planned.
- Stay at Hanakoa that night, pack up camp and go to Kalalau Beach and camp there the next day. Hike all the way from Kalalau back to the trailhead on day 3.
Option 2 wasn’t really all that appealing since even though it would make the hike a lot easier by not requiring us to carry all our stuff to Kalalau, it would really eat into our time at the beach and would add pressure for us to make it back to camp and our tent even if there was an accident or flash flood. Option 3, with us hiking the 11 miles on the last day when we would be the most tired, didn’t seem that great either. Though the hike out would be with lighter packs. What really made up our minds was that Hanakoa Valley wasn’t really all that nice a place to camp, and we really wanted to see this beach. So after a quick bite of jerky and trail mix we decided to forge ahead.
Miles 6 - 8:
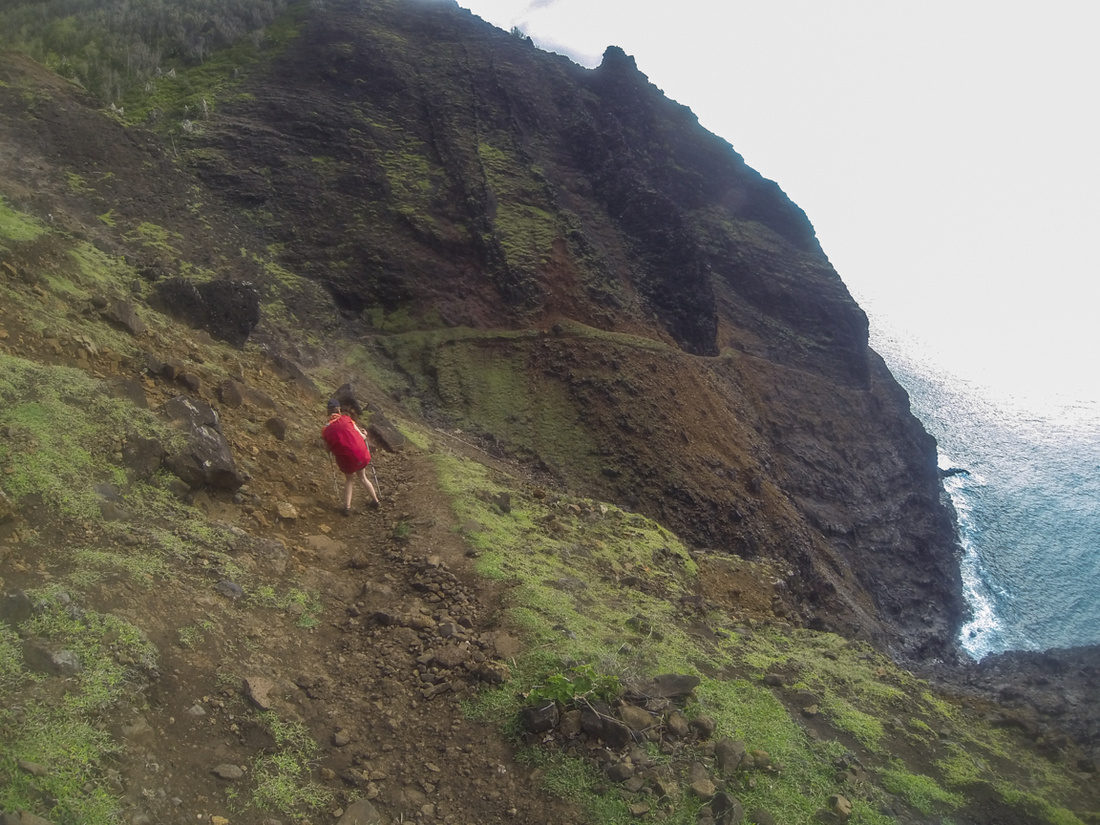
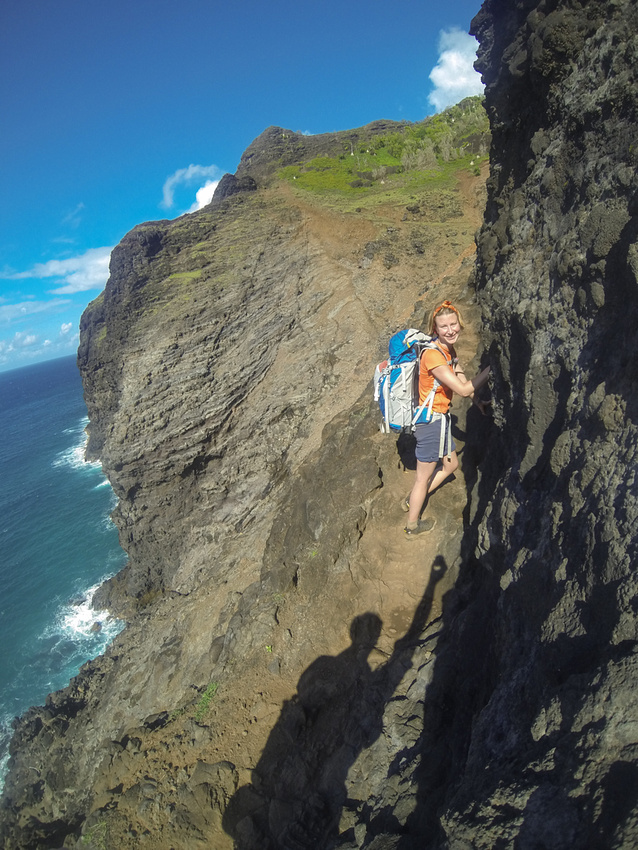
Hanakoa is a long valley, but it’s not particularly deep. After the second major stream crossing (the bigger the valley, the bigger the stream crossings) we were able to hike up and out relatively quickly. So far so good with the increased pace! Immediately after cresting the other side of it, we encountered very steep switchbacks leading down to the infamous Crawler’s Ledge, a section where the trail narrows to just a few feet across and traverses a rocky cliff a few hundred feet above the ocean below. Fortunately, this section is so steep that no foliage covered it, and the trail was bone dry, improving our footing. Still, once we passed the ominous signs warning us of death and dismemberment, fear and doubt crept into our minds. This was further advanced by legs that were already wobbly from exhaustion. Now they were becoming wobbly with nerves.
 The infamous Crawler’s LedgeJosh Schulz is hot. The sign doesn't lie.
 Starting down the steep section looking onto Crawler's Ledge wrapping around the cliff in the distance.
 The infamous Crawler’s LedgeReturn Trip
It took us probably a good 10 minutes to traverse the 100 yards or so of Crawler’s Ledge and get up the other side. Here, for the first time, we could see our destination (though we didn’t realize it at the time…).
 Hiking out the steep section just after Crawler’s Ledge
 Mile 7 Kalalau TrailThat green grassy field in the middle is just above Kalalau Beach
Miles 8 - 10:
Once we made it past Crawler’s Ledge, we were able to ride the adrenaline rush for another mile or so before we began to crash. Coming off an adrenaline high when you’re already exhausted and your body’s struggling to convert food into energy is no fun. Fortunately, right around that time we encountered our first full-time resident of the trail. A jovial bearded fellow with dark curly hair and an energetic dog, who was as equally unkempt as his master, came bounding down the trail towards us. Nicole and I saw him in the distance and just sort of stared at what he appeared to be holding in his hands. We turned to each other and said, “No, seriously? Is this guy really carrying… a bow and arrows?!”
Sure enough, he was. As he got closer we could see the homemade hunting equipment he had and also noticed his bare feet. We stopped and chatted for a little bit. After introducing ourselves I figured this guy’s name would be something like Sierraphish or Rainjava. “I’m Matt,” he said. He told us he was out hunting goat for his friends who were all down at Kalalau Beach. He was planning to take one down and then smoke it in Hanakoa Valley somewhere before bringing it back to Kalalau for a feast. It’s one thing to hear stories of goat eating hippies on the trail, but another entirely to encounter them on your own. My day was officially made. More importantly, Matt informed us that we were actually getting pretty close to the beach at this point. We just had a few small valleys to traverse before we got there. It was a little after 6 at the 4time, so we thanked him for the info and wished him well on his goat hunt before setting off, reenergized by the encounter and the promise that were were almost there. Sure enough, after making it through 3 more small valleys with 3 more small stream crossings, we came across the sight we were waiting for.
 The Kalalau ValleyGetting there just at sunset!
Part 2 coming next week! In the meantime we are off to hike Mount Whitney!
Aloha
- Scott + Nicole
Comments
I stayed back at our room but Bethany, Laura (my daughter-in-law), Tammy ( Beth's sister) went on this hike to the beach and caves. They said it was picture perfect.